“Fashion changes, but style endures.”

Coco Chanel

Hello Chumingtons! Long time no see! How I have missed my little blog over the past few weeks…sadly my attention has been required elsewhere of late! That shiz is done now though and once again I can snuggle up in my cosy internet home. Now often in the world of blogging, following a little hiatus people often have a bombardment of stuff to show and share from their time away…well unless you happen to have a particular interest in the pharmacokinetics and pharmacodynamics of warfarin, that isn’t going to be happening here!

Instead I will be sharing with you a quick tutorial which I whipped up today….and quick is the word, after a craft lull, I always like to indulge in some instant gratification and this fits the bill splendidly!

So some background, if only to remove some of the randomness. Recently I was asked if I could whip up some dog collar bandanas for a charity dealio…all very nice (and obviously I’m going to do it) but I’m personally not a bandana fan. If I’m going to dress my dog up, I want them a bit classier…and so, after failing to convince them a monocle was an excellent style choice, I managed to persuade them to sport a bow tie…and if I haven’t made it clear in the past, I think bow ties (very much like bow ties) are cool!

And so I give to you…

The Dog Collar Bow Tie

Image

Rather Dapper No? So what does one need for this…

Image

You’ll also need a sewing machine…a festive pin cushion is not a requirement but I do very much like it (’twas a crimmble present, thank you Anne!).

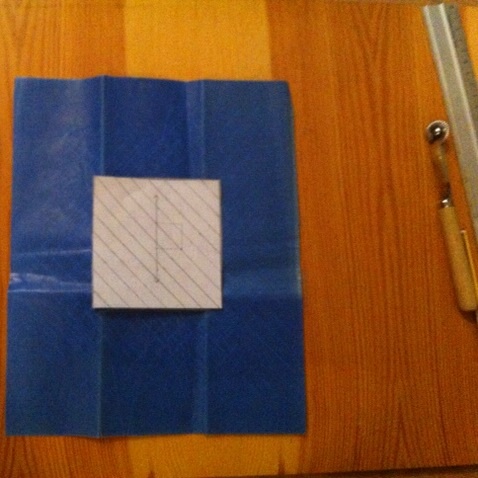
So I’ll keep this fairly brief, as they are super simple and I really don’t want to insult your intelligence (Should any of it be unclear however, just holler and I shall expand). So to business, first we need to cut out 2 rectangles of 11cm x 7cm and 2 mores of 3.5cm x 7cm.

Image

While in the grand scheme of things, direction of print isn’t likely to make much odds for something this wee (small for the non Scottish among you) I will point out that on both pieces 7cm is the “height” of the piece.

We shall start with the larger pieces…place them right sides together and sew round all four edges using the edge of your foot (as in machine foot, not you actual foot, obviously) as a guide, remembering to leave a small gap at the centre of the bottom edge. I shall now display this in pictorial form…

Image

…Trim and clip those corners….

Image

…and flip it right side out through the hole and press

Image

Not very bow tie-y as of yet…but wait…we need to concertina the centre by pinching it together and stitch in place

Image

We’re getting there now…but we shan’t dilly dally…onto the smaller pieces…right sides together again and using the edge of the foot as a guide, sew down each of the 2 longer edges.

Image

Aaaaaaaaand again, trim the seam allowances, turn right side out and press.

ImageSew the short edges to create a ring, and slip this onto the bow piece we created previously, once again hand stitching in place (through the back so it doesn’t show on the pretty side).

Image

My my my, isn’t that just beginning to look like a little bow tie! but how can we attach this to the collar? well if you’d give me a minute I’ll explain…jeez!…anyway, now comes the elastic portion of proceedings, cut a 6cm piece of elastic and sew it into a loop (I did mine by hand because it was quite thick and my machine was having a temper tantrum about it…very unlike him!). then simply sew this onto the back of your bow tie…et voila…

Image

Simply slip this elastic loop round your dogs collar and position…don’t he look fancy! Obviously, as well as making an awfully spiffy bow tie, you could equally use this tutorial to make a lurverly bow for the female pooches in your life…all my dogs are male however, with most of the bits to prove it, and so I spared them the indignity of sporting a girly bow…you’ll simply have to use your imagination…

Image

Originally I had booked the oh so marvellous Bruno for this photo shoot, but apparently he was channelling his inner Diva that day and pulled a Naomi Campbell-esque strop…this was probably best of the bunch but it’s far from ideal…

Image

He gets away with it though because he’s so gosh darn adorable…“dwee dwee, stop pointing the camera at me, dwee!”

That’s all folks!!!

“What rhubarb, senna, or what purgative drug, would scour these English hence?

Macbeth, William Shakespeare

Hello chums! Well firstly I must admit that since my last post I have barely held a needle or hook and when I have it has only been for a mere moment. Alas this means I am without any exciting sewn/knitted/crocheted or even screen printed items to share with you. It a sad state of affairs, and really not good for my sanity…CRAFTING KEEPS ME CALM!!! Unfortunately I am currently drowning in a sea of deadlines so it feels like I’ll never have the time EVER!…but soon…soon I will be free again (If I haven’t gone stark raving bonkers in the meantime)!

photo (3)

No craft, so here’s a picture of Bruno in a snood!

While working for these deadlines I have allowed myself the occasional TV show as “background” (by which I mean I watch it with work in front of me so I don’t feel guilty!). One such show, despite me finding the concept highly ridiculous, is “The Big Allotment Challenge”…if you haven’t guessed it, it is ANOTHER Bake Off slash Sewing Bee spin off (there’s a serious glut of these things on TV here in the UK, but despite the increasingly bizarre concepts I secretly can’t get enough of them!). As well as whipping out some prize winning carrots, creating a floral centrepiece for a dinner table and cooking up a nice relish, the contestants this week had to make a cordial. Is there anything more summery than cordial…well yes, but it is still very summery and given that the weather seems to be improving I decided I simply must make some (plus a nice sugar kick while essay writing is always helpful)!

Now I’d generally go elderflower, but I ain’t got none…what I do have is rhubarb (YUMMY!) so rhubarb cordial it was…

photo 4

As a side note, rhubarb is incredible! despite the fact my fingers reside on the opposite side of the colour wheel from green, it continues to grow and produce a bumper crop EVERY year…it grows faster than you can eat the stuff!

but I digress, back to the cordial…

Rhubarb Cordial
photo 3

Ingredients:
600g Rhubarb
375g Caster Sugar
750ml Water
1 small orange/Satsuma or the like
1 tbsp. Lemon juice

Appropriately sized bottle (1ltr)(sterilized)
Seive/Muslin (food quality)

So as recipes go this is so simple a child could do it, you know…if it was appropriate to let children mess around with hobs and boiling and what not…my point is it’s simple…probably could have just left it at that and spared you all this rather pointless ramble…

Righto…chop your rhubarb (which I hope is clean…no slugs or snails please!) into approximately 1″ pieces and bung in a pan. Sprinkle with the sugar and pour over the water…hopefully you’ve chosen a big enough pan…next add the zest of the orange, then slice it in half and add that too! Finally add the lemon juice (I really like jif lemons…I find them aesthetically pleasing)…

photo

Now we need to get cooking…bring to the boil and then let it simmer for 10 to 15 mins…

photo 1

Now comes the straining bit…depending on what you have to hand either sieve it or preferably strain it through muslin…let it do its thing, dripping away for about an hour to get all that scrummy goodness!

photo 2

And finally…all that’s left to do is pop it in a bottle! It should last around a week in the fridge, although this bottle was long gone well before the week was up! Replacing the lemon juice with citric acid will extend it’s life should you require it!

photo 3

When diluting use about 1 part cordial to 2 parts water…you can drink it hot or cold…add it to cocktails…gin and rhubarb, count me in! mmmm…gin!

I should probably get back to some revision now…*sigh*…I have timetabled a small amount of craft time into my week though, so fingers crossed I’ll not be so craft-less next time!

Till then, BYYYYYYYEEEEEEEEEE!!!!!!!!!!

“Some hats can only be worn if you’re willing to be jaunty, to set them at an angle and to walk beneath them with a spring in your stride as if you’re only a step away from dancing. They demand a lot of you.”

Anansi Boys, Neil Gaiman

So over the past week…in and around doing a myriad of Masters work (so many deadlines and the looming threat of EXAMS…TERRIFIED!)…I’ve been moving my stuff out of storage. While that may not sound like a massive task, I can assure you it was…so much stuff…so much of it really heavy (why did I put loads of textbooks in one box?…how I didn’t end up with a hernia I’ll never know!). It’s fun to go through all the stuff I’ve been separated from though, including this little box set of delights…

image

For the sake of not boring you I will refrain from going into quite how awesome this shiz is, but if you’re a fan of a costume drama or two, watch it I tells thee!

Being set in the twenties, the costumes are beaut…some serious quality headwear…turbans (very much like bow ties) are cool! As such I thought I’d whip up a wee turban style headband and share the process with you fine folks should you wish to try it for yo’self (I have been led to believe they are popular with the fashionable folk and Pinterest would seem to concur). So andiamo…

Turban Headband

image

Adequately modelled by Little Sis

So what does one need…

image

Aaaaaand a sewing machine…and potentially a seam ripper…

Allora, so the first step is to measure the circumference of the old noggin (head)…or more accurately from the base of the skull, across the ear and round the forehead like so…

image

If you’re anything like me you will then spend some time amazed at actually how massive your head is.

Now we need to cut our fabric which means we have to break out some highly complex maths (or math if your Americanly inclined)…

Head circumference + 3″ + (2 x seam allowance) = length
(Desired width (I used 5″) x 2) + (2 x seam allowance) = width

image

We also need a square that is 4″ + (2 x seam allowance)

image

Make sense? Well you can’t answer so I’m continuing regardless. Starting with the little square, we’re going to make the little cinching band that sits at the front of the turban…

image

Fold in half, right sides together and sew…

image

Turn right side out and press

image

Fold in half along the short edge, and sew again.

image

Trim seam allowance and turn to right side…huzzah! Cinching band DONE!
image

Now onto the larger fabric piece. Again we fold in half, right sides together along the long edge and sew (just along the long edge).image

Turn so right side is on the outside and press carefully

image

So now to provide some orientation for you. The centre of this band will sit at the back of the head…once stitched together, the seam will sit at the front hidden by the small cinching band we completed previously.

We’re now going to use shirring to provide the elasticity so it fits nice and snug while still allowing it to be put on and taken off with ease. This will sit at the back of the head, and as such will be centred around the centre of the band. The centre can be found easily by folding it in half and pressing…the crease being the centre line. From this line, measure 4″ either side and mark with tailors chalk on the right side.

image

Ok, so the photo here isn’t the clearest but it’s clear enough in real life…now we simply have to shirr from top to bottom, this 8″ section. If you’re comfortable with this technique jump on a bit, however if you need some hand holding read on…

image

First things first, we need to replace your bobbin thread with shirring elastic…this needs to be hand wound (i.e. Don’t use your machine) with a slight stretch put on the elastic. Then bang it in your machine as you would otherwise.

With the right side uppermost (so shirring elastic sits on the wrong side) line up the needle with the tailors chalk and so the foot lines up with the edge of the fabric.

image

Sew till you reach the second line of tailors chalk. The first line of shirring won’t be particularly dramatic, but don’t panic it’s totally normal, see…

image

Repeat this again, however this time line up the edge of your foot to your previous line of stitches. As you sew, stretch out the fabric so it lies flat.

image

Keep repeating this over and over…

image

Till you’ve made it to the bottom.

image

To secure the elastic you can back tack at the start and end of each row, however I prefer to tie them by hand (much neater!). By pulling slightly on the elastic, the upper thread is brought to the back and the two can be securely tied together.

image

Finally, hover your iron above and blast some steam onto the shirred area…you’ll see it shrink down further, which I feel is quite pleasing.

Before sewing the two remaining edges together, slip on the cinching band (It won’t go on otherwise).

image

Now line up the raw edges and sew.

image

Press the seams open and slide the cinching band over the seam to hide it.

image

Aaaaaaand finally, hand sew the cinching band in place on the wrong side to hold everything in place.

image

And we are done…I would add that you can also do this with stretch fabric, which is even easier (assuming you enjoy working with stretch). In this instance you simply don’t add the 3″ to the length of the band, and omit the shirring stage…über simple! Now all that’s left to do is pop it on, grab some Champaign and Charleston the night away.

Toodle pip!

Uprose the Monarch of the Glen Majestic from his lair, Surveyed the scene with piercing ken, And snuffed the fragrant air.

Legends of Glenorchay

It is a truth universally acknowledged, that put a stag on something and I will invariably want to own it soooooooo badly! Deer (like bow ties) are cool and are extremely high up on my list of dream pets!

You can imagine my delight therefore when I saw a pattern for kilt socks with…you guessed it…stags on them. Now I don’t really have the legs for a kilt, but I really wanted a pair of socks for under me boots and these fit the bill…also it uses up the mustard wool I bought a few weeks back, assuaging some of the guilt I had for breaking my wool buying rule (see here).

image

The pattern is a bit more understated and actually has the stag as a textural effect, but I’m not one for subtlety when it comes to antlers. Instead I simply substituted purl stitches with a contrast colour…BROWN…In the words of Linda Barker (in a UK Sofa ad) I like it, I think you will too!

image

I don’t think I’ll do too much close up knitting photography in future as I can see all my mistakes slash dodgy patches…

Should you wish to knit your own kilt socks (with or without stags…although why you’d choose anything else I cannot comprehend) I am using Patons 3285…

image

No Stags…thumbs down!

I stole borrowed the pattern from my mother but it can also be found here or at many other fine retailers. If you’re buying yarn specifically, I’d recommend Diploma gold (Patons) over the yarn I’ve used here. Generally you want a bit of acrylic in socks as 100% wool will wear much more quickly, clearly not ideal after all that work.

Truth be told, for this very reason I’ll probably omit the foot of these and create kilt leg warmers so to speak…Very Haute Couture non? And if not, well no one (except you dear reader) will know any different when they’re worn under my boots!

To conclude here are some pictures of deer from my local deer centre…you get to feed them! Actually makes me super happy!

This slideshow requires JavaScript.

Obviously these photos are old…the weathers not currently quite this bad in Scotland…

“As Gregor Samsa awoke one morning from uneasy dreams he found himself transformed in his bed into a gigantic insect.”

The Metamorphosis, Franz Kafka

Sometimes I look at fabrics in my stash and seriously question what the heck I was thinking when I purchased them…enter stage left, shiny shiny fabric!

image

Now it’s not that it’s particularly offensive, I just have no idea what I’d planned to do with it…but with my aim of actually depleting some of my stash this year I decided to come up with a new plan. So after several cups of tea and some mad sketching I settled on a 50s inspired silhouette…dress, halter neck, sweetheart neckline and a 1/2 circle skirt…while the inspiration was based in the 50s, I definitely think in reality it’s going more bad 80s prom dress. Now this may sound like a bad thing, but if anything I think I love it more (please don’t judge me!)

Now I had concerns that using the fabric ‘as is’ for the whole dress might be a bit much so A bit of fabric manipulation was in order. It’s one of the things I love most about fabric, a few chops…a few changes…some razzle…some dazzle…and shazzam, you have something new and unique!

image

In this instance I decided to use a shredding/cutting technique to chevron up the bodice…I likes it I do! To give you a better idea here’s a close up Mr DeMille…

image

TRANSFORMED!!! And super duper easy too! Should you wish to give this technique a go, you are in luck because I’m about to delve into the world of tutorial-ing (I’m a total newbie at this so please don’t be mean if it’s a bitty rubbish!)…

Tutorial – Fabric Manipulation: Bias shredding

Firstly… You will need…

image

Oh and thread (matching or contrasting, whatever takes yo fancy!) and a sewing machine (hand sewing would work, but ain’t nobody got time for that!).

Once you have all these things, arrange them nicely to comply with any OCD tendencies then we’ll begin…

So firstly we need to determine the bias (if it isn’t already marked on the pattern piece). The easiest way of doing this is to use the grain line marked on the pattern and draw a square like so (mine is 2cm FYI)…

image

All you then have to do is draw a line which crosses opposite points of the square…et voila…bias!

image

Using this first line, further lines can be drawn to cover the pattern (I’ve opted for 1cm spacing but there are no hard and fast rules…go crazy!)

image

These lines can be transferred to the fabric in a number of ways but I like to use carbon paper personally. Place the carbon paper face up, then put the 2 fabric pieces on top (these will become one layer eventually) with the equivalent of the wrong side facing down…and pop the pattern piece on top and go to town with your tracing wheel!

image

You should now have lines a plenty on the ‘back’ of your fabric (the fabric here is double-sided which is why it looks the same as the front).

image

Sewers…to your machines! Sew down each line, making sure reverse stitches are in the seam allowance (for neatness sake…which is important!). Also make sure you sew in the same direction…also makes it all nice and neat!

image

I’m only pretending to sew here as I needed my other hand to take the photo…the joys of being a one man show! Anyway, sew sew sew till you’ve sewed all the lines…

image

Now, as you can see the carbon lines are still pretty obvious but we don’t care because this is the wrong side and no one will see it (unless you want them too!)…now flip it over to the pretty side!

image

Now begins the scissor wielding section, so if you are prone to clumsiness please ask a proper grown up to supervise. Simply slip the blades between the two layers of fabric and cut the top layer only between each row of stitches.

image

Keep cutting…I find it hurts my hand after a while so if you’re doing a large piece schedule some breaks…ideally with cake but it’s not obligatory (who’m I kidding!…cake cake cake!)

image

In this photo I’m once again faking it…I’m actually using my feet to hold the scissors…not recommended for actual cutting!
Finally all that’s left to do is marvel at your handiwork…having cut on the bias your edges shouldn’t fray excessively so nowt to do with those…simple!

image

I’ve used a small square to demo this here but it works just as well on proper pattern pieces and using most fabric (stretch fabrics not so much, or not without some technique adaptions)…I will say however that if you’re using pattern pieces with darts and such, be careful with the thickness of fabric you’re using as it quickly gets quite bulky!

image

I hope you have enjoyed. This presentation was brought to you by B with no help whatsoever from the moon…lazy blighter!

“Happiness is a warm puppy.”

Charles M Schulz

So despite the fact that it is currently verging on midday as I sit here writing this, I am still lounging around in my oh so masculine kimono dressing gown…

Kimono Macho macho man…

Despite this I have actually been reasonably productive, both with boring stuff like dishes and more blog appropriate tasks like screen printing, huzzah! So what have you been screen printing today I hear you ask (either that or the voices are back…)? Well, seeing as you asked ever so nice…I am once again screen printing a gift, this time for Mothers Day. Now I grant you we are still several weeks away from the day (it’s the 30th of March for those of you who are now trying to remember when it is this year!) but given my previous rushed attempt and the DISASTER (okay, possibly overstating it a tad…you can judge for yourself here) that ensued, I thought I’d allow myself more time in this instance.

So coming up with a stencil was far from a taxing endeavour. I simply asked myself, what does the mothership love more than anything else…even more than her wonderful and talented children…

image Jethro!

While it would be nice to say nothing, I have come to terms with being secondary in the hierarchy of affection to the new puppy…I’m the same with my two so who am I to judge! So anyway, I decided to create a cairn terrier stencil (for those of you who don’t know what one looks like, think toto from the Wizard of Oz)…

image

…and printed it onto a T-shirt like so…

image

Job done!

“Second hand books are wild books, homeless books; they have come together in vast flocks of variegated feather, and have a charm which the domesticated volumes of the library lack.”

Virginia Woolf

While I will admit to being far from the easiest person to please, three things that invariably get one excited (if your mind went somewhere dirty there, you are a pervert!) are sewing, secondhand books and bargains! You can therefore imagine the Cheshire Cat style grin affixed to my visage when I came across this hefty tome in a local charity shop for the miniscule sum of 2 of our most great british pounds! Huzzah!

Complete guide to sewing

As far as I’m aware it’s the 1981 version, but more importantly it is a treat of a book which is a welcome addition to la biblioteca. On, what one would term a thorough flick through I would proclaim it to be most excellent, for newbies and old…bies. There are even sections on “Providing room to grow” (so you can force your child to wear the dress you made for their first birthday well into their early teens) and upholstery (a beginner’s guide I grant you but still rather impressive non?).

image

And then there are the patterns…I’m a huge vintage sewing pattern fan, but sometimes they can be borderline HYSTERICAL…here we have the full gambit…

The Good…

image
I actually want to make one of these quite badly…I would name him Carlos…there’s also a pretty mean looking stegosaurus named Derek which, as dinosaur names go, is appropriate in my opinion (can you really argue with alliteration?). I am suddenly left questioning though why the dinosaur is allowed a name but the crocodile is merely ‘cuddly’…tut tut RD, I dislike your toy hierarchy…

The Workable…
image

Can you ever really go wrong with a good shirt slash shirt dress? With some fairly minor tweaks and good fabric choice I think this could be a winner!

…Aaaaaaaaand the downright ugly!
image

This ‘party dress’ would nowadays be considered child cruelty…with that in mind, I have now begun using this as a threat to keep little sis in check…safe to say, her room is spotless!

I am merely dipping my toe in the wonders this book has to offer, but it’s safe to say that should you too find this for a steal (by which I mean cheap…I do not condone or encourage thieving) I suggest you buy it because it’s the dog’s boll…ards…

Done!

“Boys who spent their weekends making banana nut muffins did not, as a rule, excel in the art of hand-to-hand combat.”

Dress Your Family in Corduroy and Denim, David Sedaris

So once again It’s been a fairly craft sparse week, the time thieving culprit this time…ruddy migraines!

I did however attend a pleasant knitting evening at a new knitting shop in Dundee called ‘Fluph’…should you be in the Dundee area it’s worth a visit as there is some very nice wool which I was careful to drool around rather than on!…around my extensive stock perusal and tea drinking, I did manage to do a wee bit o’ knitting. Huzzah!

Specifically I finished the first of a pair of slippers I was knitting for myself…now the pattern I used (available here) is actually a woman’s pattern, but having knitted it several times I thought I could masculinise it…with pom poms…now that I’m writing this I’m not sure why I ever thought that was a realistic plan…but safe to say pom poms don’t butch up anything.

Knitted slipper

I’m now not sure whether I’ll give these away or save them for the days I’m indulging my feminine side, watching rom coms and eating ice cream (please note this isn’t meant to be a horrible stereotype of women, this is something I genuinely do…on a regular basis…), I’ll knit slipper number two and then decide.

Continuing with the yarn theme, while at the knitting evening I obtained some beautiful mustard wool…

Mustard wool
DROPS Karisma Colour 52

Now despite me banning myself from buying wool without a project in mind, I got it anyway…with no idea what to do with it…and I still have no idea…HELP! For now I’ll simply stare at it longingly…

До свидания
(Which is goodbye in Russian…I hope!)

“Progress is not accomplished in one stage.”

Les Misérables, Victor Hugo

Well hello! Long time no see! Well it’s been over a week…but this past week has been, what one might refer to as a blooming nightmare…

But I am not here to complain, that I shall save for my long suffering family (don’t pity them, it is their job after all!). Given the hectic-ness of recent times, my crafting time has sadly been limited (to which I yell a resounding BOOOOOOOOOO!). However, I do not entirely lack achievements and I shall share some of the progress I have made with you right here, right now!

Keyhole bodice

First up we have a partially completed bodice, which won’t take long to become a fully fledged dress…although I am undecided with what to do for the skirt which might slow things up as I can, on occasion, be insanely indecisive…but no, I shall be bold and think positively!

I draped it a few weeks back but only just got round to sewing it up. I’ll be honest with you though…this is the second attempt at this bodice…apparently I was a touch stingy with ease in this garment, and rather selfishly little sis (who the dress is for) insists on being able to breathe in her clothes! Kids these days…

Moving on…I also decorated a cake for a family friend’s birthday. She likes penguins (although who doesn’t!).

Penguin cake

I hadn’t planned to put any baking on this blog, but I decided to make an exception here to convince myself I’ve not spent the past week drowning in admin!

I fear I must now depart dear reader, as the dogs seem to be most insistent that I am not paying them nearly enough attention!

Diesel
“Hello, my name’s Diesel, I like to lie on overlocker pedals…preferably when hours worth of work is under the blade!”

Auf Weidersehen!

“Sitting here with one’s knitting, one just sees the facts”

The Thirteen Problems, Agatha christie

So today I should be attempting to complete, or more accurately begin an essay for my MSc…and if I’m honest, I’m thoroughly uninspired by it (predominantly because the class it was for was an unmitigated waste of time!). Up until a short while ago I couldn’t even bring myself to come up with the focus of said essay…so I decided to whip out the old needles, stick on an audiobook (The Magicians Nephew, C.S.Lewis) and channel my inner Miss Marple.

1/2 a slipper...

Now I wouldn’t refer to it as a ‘Eureka’ moment, more of a ‘that’ll do, I s’pose’ moment. The important thing is however I have the concept, and only halfway through slipper one! Knitting thou art AWESOME! I will now most likely rejoice in this fact for the rest of the day, conveniently avoiding doing any of the actual essay writing…but what ya gonna do.

To summarize…knitting good, essay bad!

So long
*and with a swish of his cape he was gone…*